That familiar musty smell hits you first. Then you see it-dark, creeping spots on the bathroom ceiling or behind the wardrobe. For Sydney homeowners, discovering mould is more than an ugly inconvenience; it’s a serious worry for your family’s health and your home’s integrity. The immediate question is always the same: how to get rid of mould and make sure it never comes back?
Don’t wait until the problem worsens-because it will. The internet is full of conflicting advice, and supermarket products often fail to address the underlying cause, leading to the mould’s aggressive return. You’re left wondering if you can handle it yourself or if it’s time to call in an expert. This complete guide provides the clear, actionable answers you need. You will learn the safe, effective DIY steps for tackling minor mould outbreaks and, crucially, understand the signs that demand a professional for a permanent solution. It’s time to restore safety to your home and gain the peace of mind you deserve.
First Steps: Identifying Mould and Assessing the Risk in Your Home
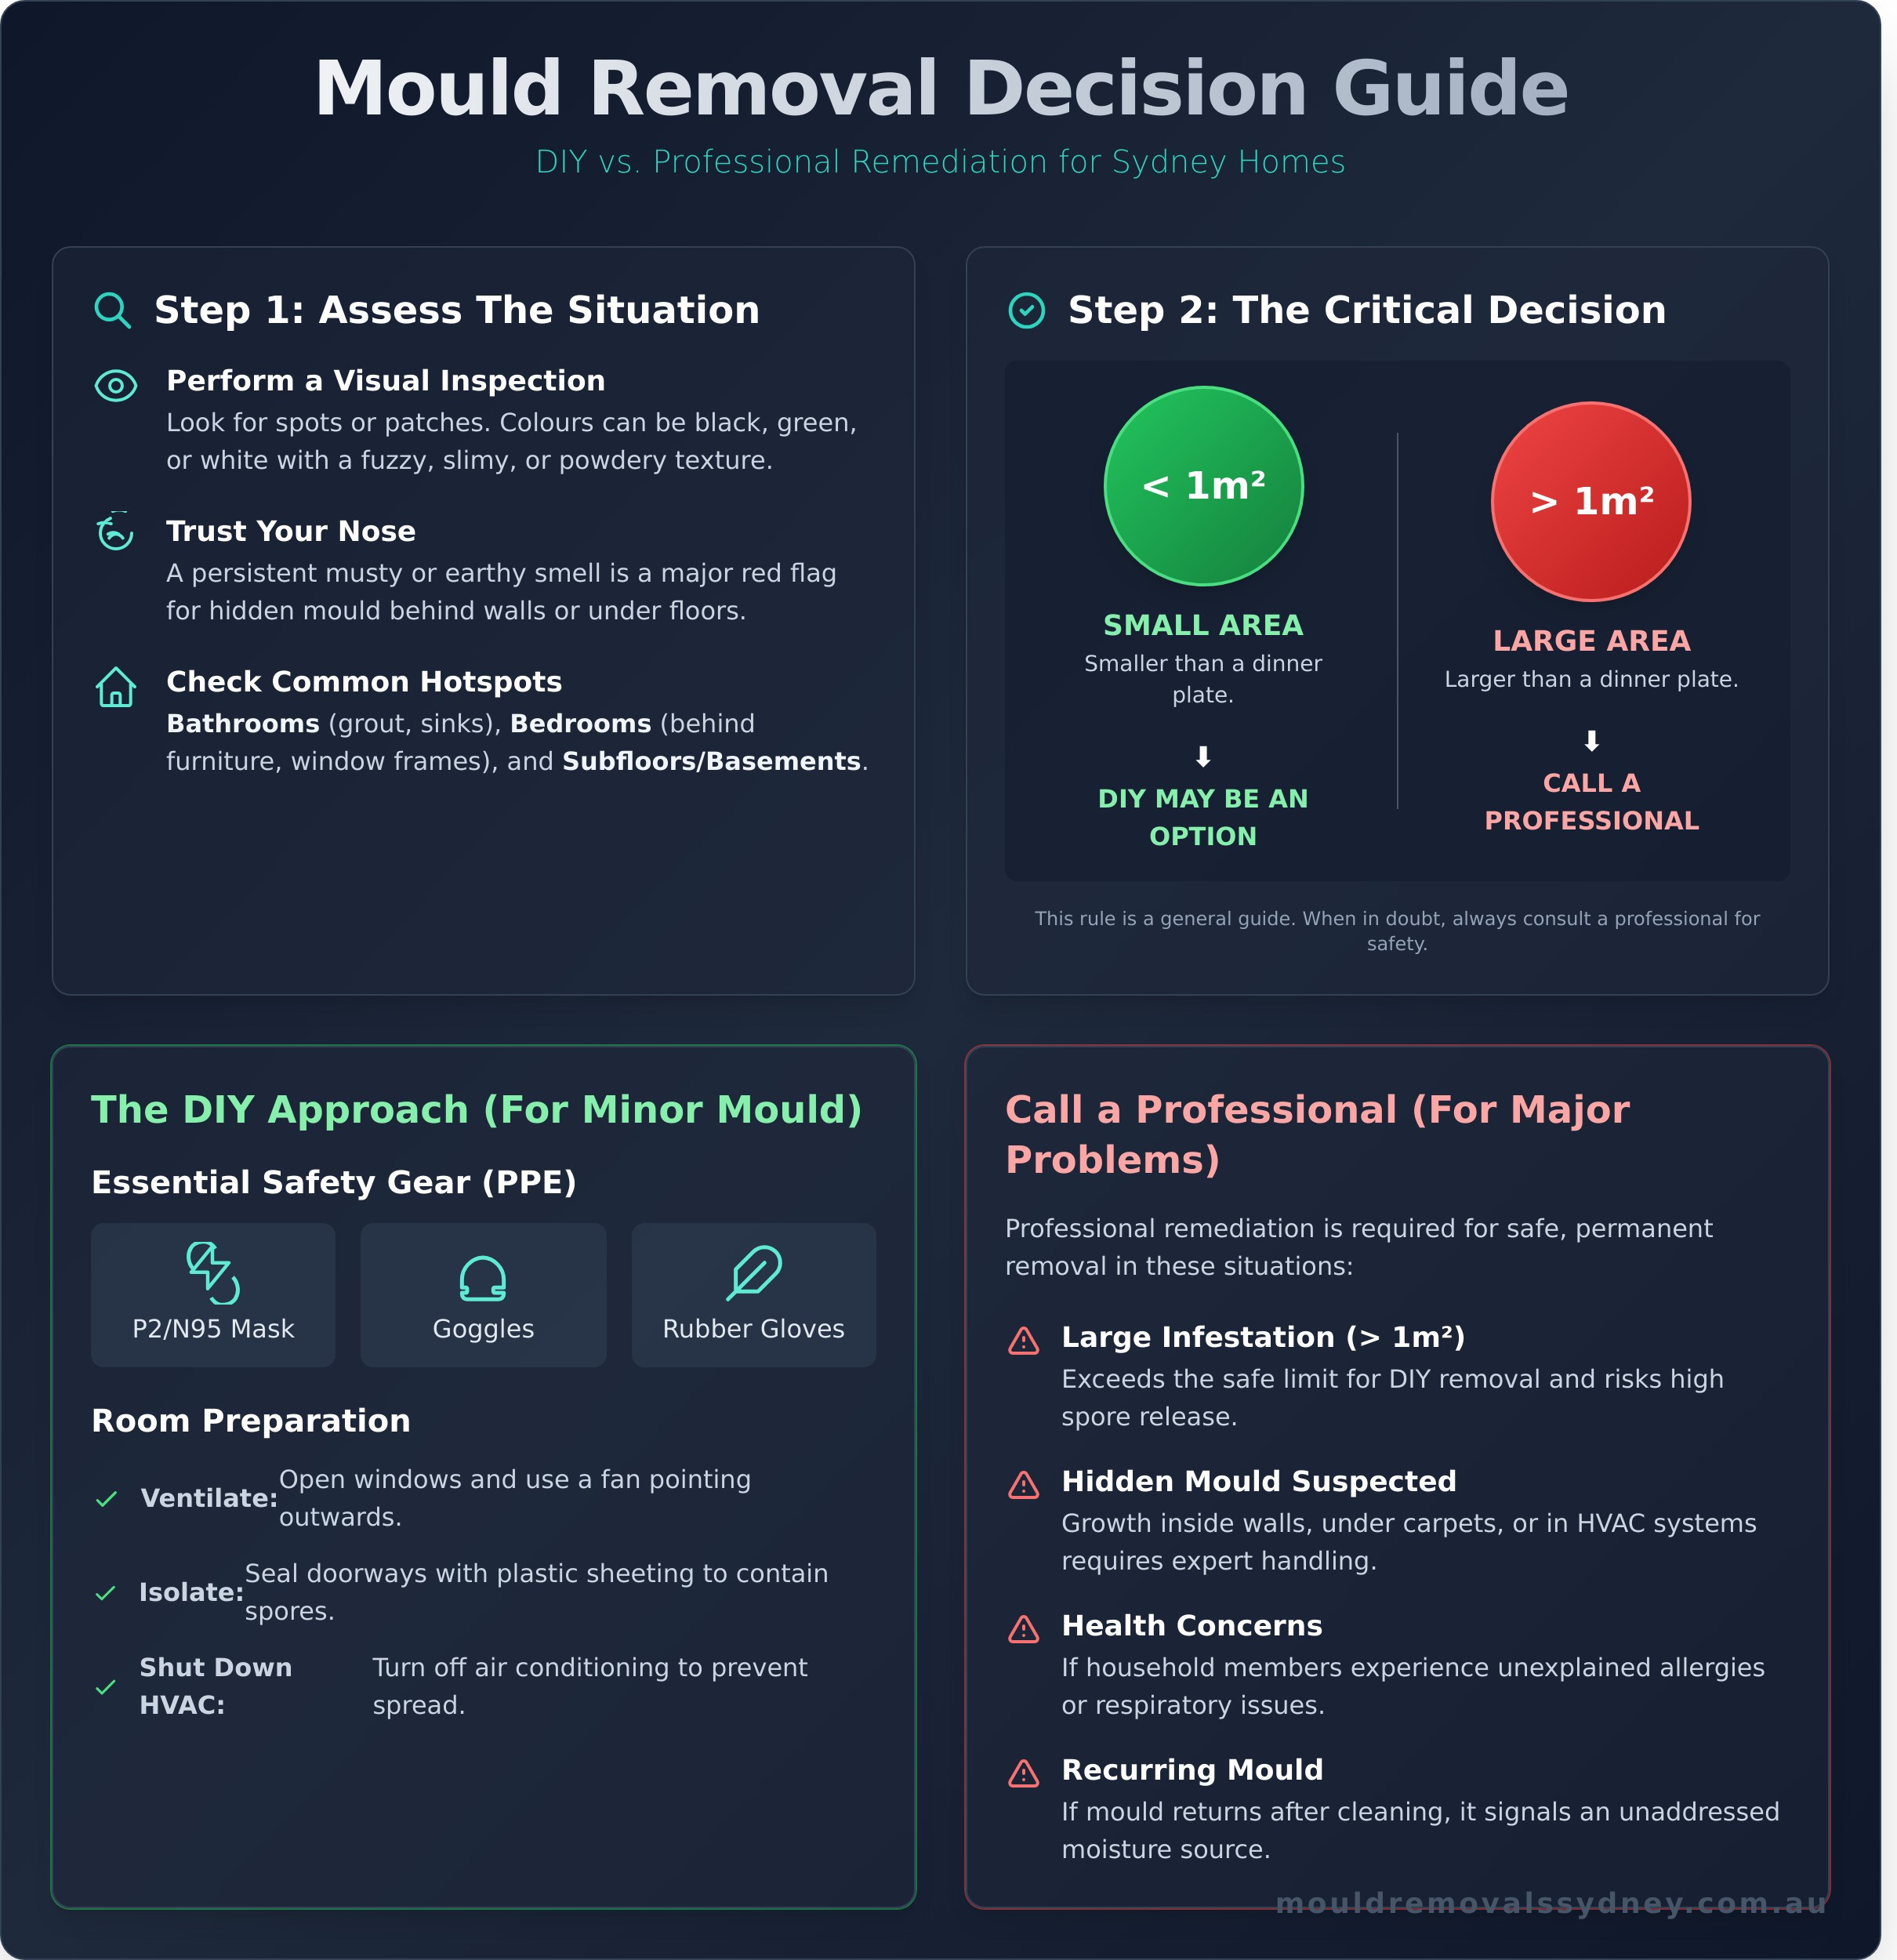
Before you can effectively tackle a mould problem, you must first identify its presence and understand the scale of the issue. The first step in learning how to get rid of mould is a thorough visual inspection. Don’t wait for the problem to worsen-because it will. Understanding what is mould, a type of fungus that thrives on moisture, is critical to protecting your property and health.
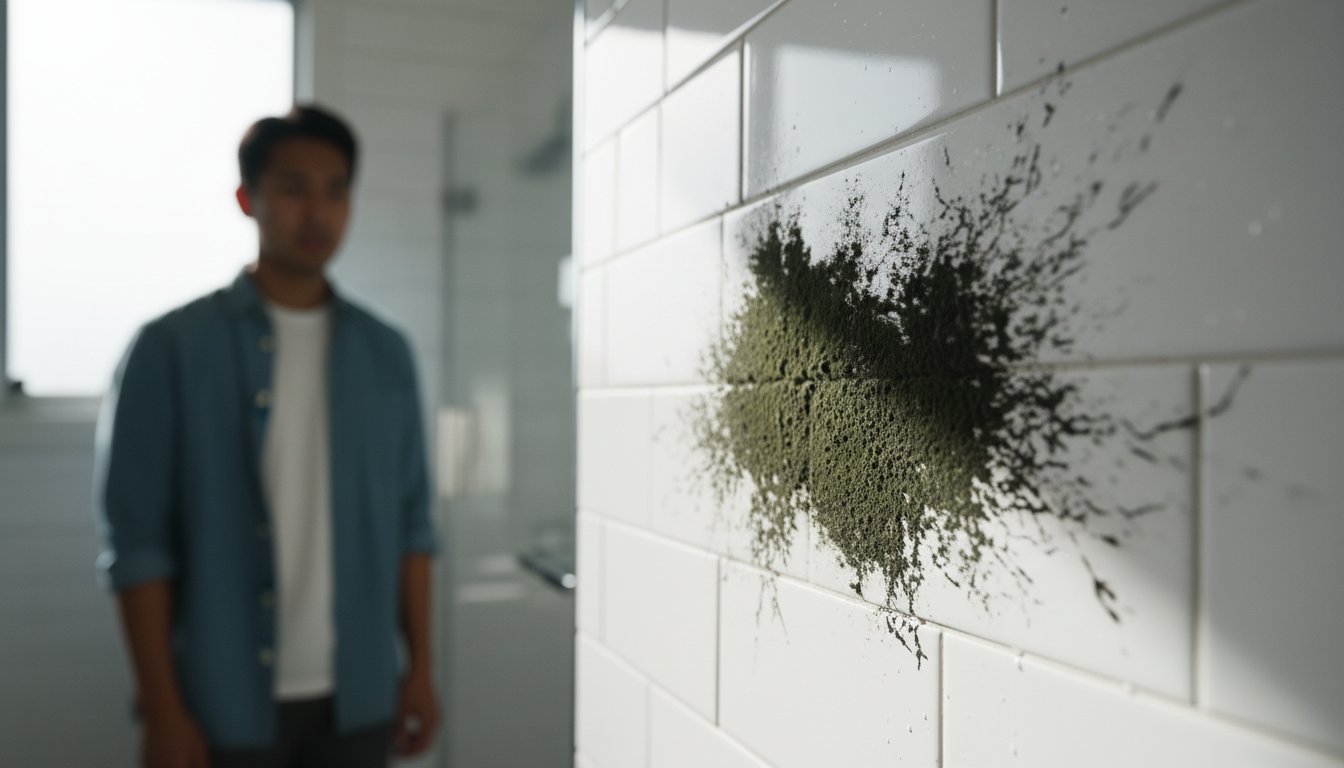
Start by looking for visible signs. Mould often appears as spots or patches and can be a variety of colours; black, green, and white are common in Sydney homes. The texture might be fuzzy, slimy, or powdery. However, your eyes aren’t your only tool. A persistent musty or earthy smell is a major red flag, often indicating a hidden mould source behind walls or under flooring. Remember, any visible mould could be the tip of the iceberg, signalling a much larger, unseen infestation.
Common Mould Hotspots in Sydney Properties
Mould thrives in damp, dark, and poorly ventilated spaces. In a typical Sydney property, pay close attention to these high-risk areas:
- Bathrooms: Check shower grout, sealant around tubs, under sinks, and near exhaust fans where steam and condensation accumulate.
- Bedrooms & Living Areas: Look behind large furniture placed against external walls, around window frames where condensation forms, and on ceilings from hidden roof leaks.
- Subfloors & Basements: These areas often have limited airflow and higher humidity, creating a perfect breeding ground for widespread mould growth.
The 1 Square Metre Rule: When to Stop and Call a Professional
While small mould spots can sometimes be handled with DIY methods, larger or more complex situations require professional mould remediation to ensure it’s removed safely and permanently. You should stop and call a certified expert if you encounter any of the following:
- The total area of mould growth is larger than a dinner plate (approximately 1 square metre).
- You suspect mould is growing inside walls, under carpets, or within your HVAC system. Disturbing these areas can release a high concentration of airborne spores.
- Anyone in the household is experiencing unexplained respiratory issues, allergies, or other health problems.
- The mould returns quickly after you have cleaned it, which indicates an underlying moisture problem that hasn’t been fixed.
Safety First: Your Essential Mould Removal Toolkit and Precautions
Before you even think about scrubbing a single spot, understanding the risks is critical. Mould isn’t just an unsightly stain; it releases microscopic airborne spores that can pose serious health risks when inhaled. Attempting to remove mould without the right precautions can make the problem worse, spreading contaminants throughout your home and endangering your health. When learning how to get rid of mould, safety is not a suggestion-it’s the first and most important step.
Must-Have Personal Protective Equipment (PPE)
Never underestimate the importance of professional-grade PPE. This gear creates a vital barrier between you and harmful mould spores. Your essential kit must include:
- P2 or N95 Respirator Mask: A simple dust mask is not enough. You need a P2-rated (the Australian standard) or N95 respirator to effectively filter out the fine mould spores that can damage your respiratory system.
- Safety Goggles: Protect your eyes from direct contact with airborne spores and any cleaning solutions you use. Choose non-vented goggles for the best protection.
- Long Rubber Gloves: Prevent skin contact with mould and harsh chemicals, which can cause irritation or allergic reactions.
Preparing the Room for Safe Cleaning
Your primary goal is to contain the mould and its spores to one area. Failing to isolate the room is one of the biggest mistakes in DIY mould removal. These preparation steps are essential for a safe and effective clean and align closely with official NSW Health mould safety guidelines for homeowners.
- Ventilate the Area: Open all windows and place a fan pointing outwards to push contaminated air outside. Do not point fans at the mould, as this will dislodge spores into the air.
- Seal Off the Room: Use heavy plastic sheeting and painter’s tape to cover doorways and any vents connecting to the rest of the house. This creates a containment zone and prevents cross-contamination.
- Shut Down HVAC Systems: Turn off your heating, ventilation, and air conditioning (HVAC) systems before you start. This ensures airborne spores are not circulated to other rooms through your home’s ductwork.
By following these safety protocols, you create a controlled environment for tackling a minor mould issue. This preparation is the foundation of learning how to get rid of mould effectively and safely. Remember, if the mould covers an area larger than one square metre or if you suspect it’s hidden behind walls, it’s time to call a professional. Your health is not worth the risk.
The DIY Method: Cleaning Small Mould Patches on Non-Porous Surfaces
If you’ve spotted a small patch of mould on your bathroom tiles or a window frame, you may be able to handle it yourself. This DIY approach is strictly for minor spots-typically less than one square metre-on hard, non-porous surfaces like glass, metal, or glazed tiles. For anything larger, or on porous materials like plasterboard or wood, professional mould remediation is essential. Even the official EPA mould cleanup guide stresses that extensive contamination requires expert intervention.
Before you begin, put away the bleach. While it’s a common go-to, bleach is not the effective solution many believe it to be. It can damage surfaces and release toxic fumes when mixed with other cleaners. More importantly, it often only removes the surface colour of the mould, leaving the underlying root structure intact to regrow. A safer and more effective solution for how to get rid of mould on these surfaces is already in your pantry.
Step-by-Step Cleaning Guide for Tiles and Grout
For a reliable and safe cleaning solution, white vinegar is your best tool. Its acidic nature kills the mould at its roots. Follow these simple steps for a thorough clean:
- Create Your Solution: Mix a solution of 80% undiluted white vinegar and 20% water in a clean spray bottle.
- Spray and Wait: Liberally spray the mouldy area. Do not wipe it immediately. Let the solution sit for at least one hour to penetrate and kill the mould spores.
- Scrub and Wipe: Use a stiff-bristled brush to scrub the area firmly, dislodging the mould from the surface and grout lines. Wipe the area clean with a damp cloth.
- Dry Completely: This is the most critical step. Thoroughly dry the area with a clean towel or cloth. Any remaining moisture will create the perfect environment for mould to return.
Common DIY Mistakes to Avoid at All Costs
An incorrect technique can turn a small problem into a whole-house contamination. Avoid these critical errors to ensure you don’t make the situation worse:
- Never dry-scrape or sand mould. This will release a massive cloud of microscopic spores into the air, spreading the contamination throughout your property and creating a serious inhalation risk.
- Don’t use a standard vacuum cleaner. Household vacuums, even those with HEPA filters, are not sealed well enough to contain mould spores. The machine’s exhaust will simply blast the spores back into your air.
- Avoid painting over mould. This is a temporary cosmetic fix that does not kill the mould. It traps moisture behind the paint, allowing the mould to continue growing. Eventually, the paint will peel and flake, revealing a much larger problem.
Why DIY Fails: The Hidden Dangers of Airborne Spores and Porous Materials
When you see a patch of mould on a wall, it’s tempting to grab a bottle of bleach and start scrubbing. This is one of the biggest mistakes homeowners make. The visible mould is merely the “flower” of the organism. The real problem-the root system, or mycelia-is growing deep inside the material, completely untouched by surface sprays.
Attempting to wipe or scrub mould, especially on porous surfaces, does more than just fail to solve the problem; it makes it significantly worse. Disturbing a mould colony without proper containment protocols releases millions of microscopic spores into the air. These invisible particles travel through your home and settle on other surfaces, starting new colonies and turning a small issue into a whole-house contamination.
The Problem with Porous Surfaces
Materials like plasterboard, wood, insulation, and carpet are like sponges for moisture and mould. Their porous nature allows the mould’s roots to embed deep within, far beyond the reach of any surface cleaner. When you’re researching how to get rid of mould on these materials, simply cleaning the surface is a guaranteed failure. Often, the only truly effective and safe solution is the professional removal and replacement of the infested material.
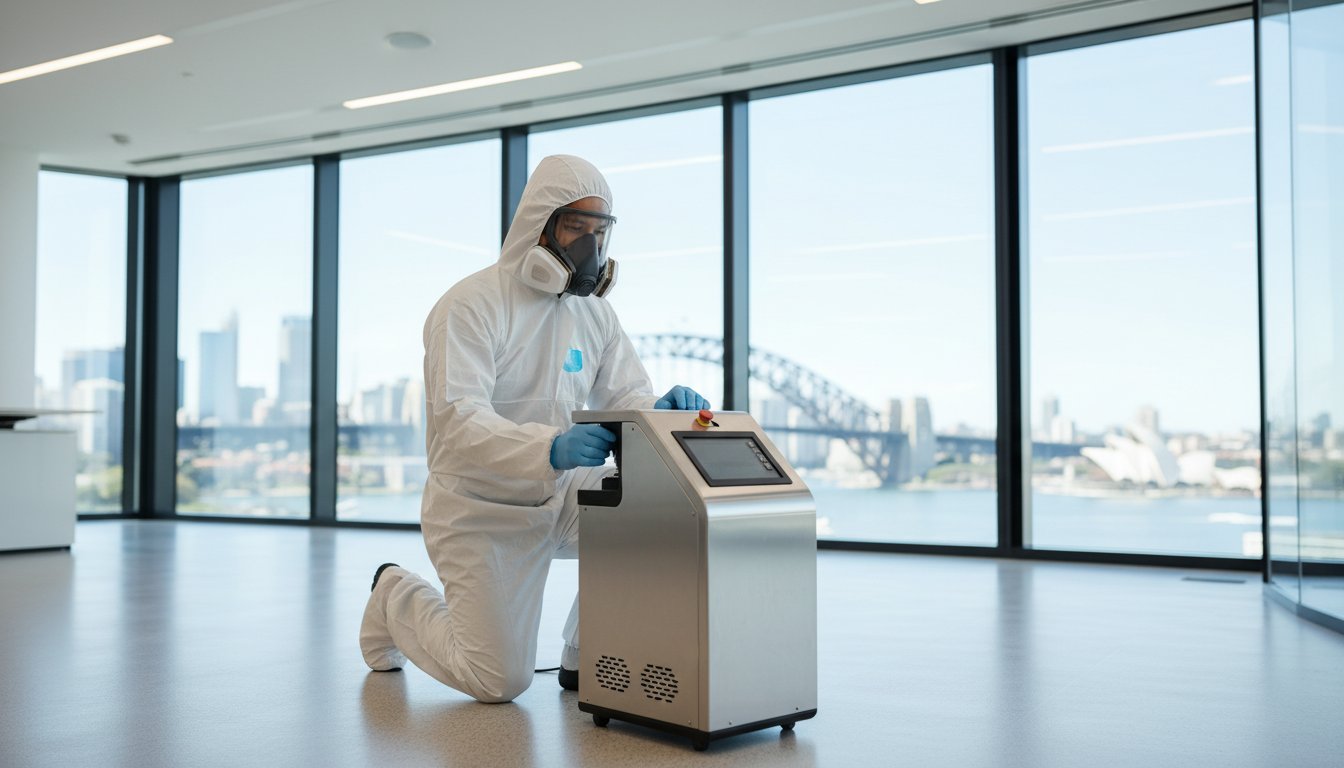
How Professionals Eliminate Airborne Spores
A key part of professional mould remediation that DIY methods cannot replicate is dealing with airborne contamination. We don’t just clean what you can see; we clean the air you breathe. Our certified technicians use commercial-grade air scrubbers with HEPA filters to capture airborne spores directly from the environment. More importantly, we use the industry-leading Goldmorr System, which involves a non-toxic, biodegradable fogging process to neutralise spores in the air and on every surface. This crucial step ensures the mould doesn’t return.
Worried about what’s in your air? Don’t risk spreading the problem. Book a professional mould inspection today.
The Professional Solution: What to Expect from a Mould Remediation Expert
While DIY methods can offer a temporary fix, they often fail to address the root cause of the infestation. When you need a permanent answer to how to get rid of mould, a professional service is the only reliable choice. This isn’t just a cleaning job; it’s a comprehensive remediation process designed to safely remove the contamination and, most importantly, prevent its return. Our master technicians use specialised equipment and a proven, multi-step system to restore your home to a healthy, safe condition, giving you complete peace of mind.
Step 1: Inspection and Moisture Sourcing
The first step is always to find the source. Our experts use advanced tools like moisture meters and thermal imaging cameras to pinpoint the exact cause of the dampness that allowed mould to grow. Based on these findings, we develop a tailored remediation plan for your property. You receive a detailed report and a transparent, no-obligation quote for the required work, so you know exactly what to expect.
Step 2: Containment, Removal, and Air Purification
To prevent cross-contamination, we establish critical containment barriers to completely isolate the affected area. During the removal process, we run powerful air scrubbers with HEPA filters to capture and remove airborne mould spores from the air. Any non-salvageable, contaminated materials, such as plasterboard or insulation, are then carefully removed and disposed of according to industry safety standards. This is a critical part of how to get rid of mould safely and effectively.
Step 3: The Goldmorr System Fogging Process
After all visible mould is physically removed, we deploy the industry-leading Goldmorr System. A fine, non-toxic, and biodegradable fog is used to treat the entire volume of the contained space. This process reaches every crack, crevice, and surface, killing any remaining microscopic spores in the air and on surfaces. It ensures no viable spores are left behind to start a new colony, guaranteeing a thorough and lasting result.
See the difference a professional, proven system can make. Request your free, no-obligation quote now!
Your Path to a Healthy, Mould-Free Home Starts Now
Navigating a mould problem in your Sydney home can be stressful. We’ve shown that while small spots on non-porous surfaces might seem like a simple DIY fix, the real threat often lurks unseen. Airborne spores and mould hidden within porous materials like plasterboard and wood pose serious health risks and won’t be solved by bleach alone. This is why understanding the difference between surface cleaning and professional remediation is critical for your family’s well-being.
The most reliable and effective answer to how to get rid of mould permanently is to trust the experts. Don’t let the problem spread and become more hazardous. As Sydney’s trusted local specialists, we provide guaranteed results using the industry-leading Goldmorr System. We don’t just clean the mould you see; we eliminate it at the source and purify the air you breathe, ensuring your home is safe again.
Take the first step towards reclaiming your home today. For a fast, no-obligation assessment, send us images of your mould for a fast, free quote! We will beat any written quote by 10%. It’s that simple to get your peace of mind back.
Frequently Asked Questions
Can I just paint over mould to get rid of it?
Absolutely not. Painting over mould is a common but dangerous mistake. It does not kill the fungus; it simply traps it underneath the new paint layer. The mould will continue to grow, feeding on the paint and the material beneath it, which can lead to more significant structural damage and health risks. To effectively solve the problem, you must completely remove the mould and address the moisture source before you consider repainting the area.
Is black mould really that dangerous to my health?
Yes, exposure to certain types of black mould can pose serious health risks. While not all black-coloured mould is the toxic Stachybotrys chartarum, many types release airborne spores that can trigger allergic reactions, asthma attacks, and other respiratory problems. Individuals with compromised immune systems, young children, and the elderly are especially vulnerable. It is always best to treat any mould growth as a potential health hazard and have it addressed by a professional.
How much does professional mould removal cost in Sydney?
In Sydney, professional mould removal costs can vary widely. For a small, contained area like a bathroom corner, you might expect to pay between A$500 and A$1,500. For more extensive infestations that cover multiple rooms or are hidden within wall cavities, the cost can range from A$2,000 to A$8,000 or more. The final price depends on the size of the affected area, the severity of the growth, and the complexity of the required remediation.
What’s the difference between mould and mildew?
While both are types of fungi, the key difference lies in their appearance and severity. Mildew is typically a surface-level fungus that appears as a flat, powdery patch of grey or white. Mould, on the other hand, is often fuzzy or slimy in texture and can be green, black, or other colours. Crucially, mould penetrates deep into surfaces like drywall and wood, causing structural damage, whereas mildew growth is confined to the surface. Mould is a threat; mildew is a nuisance.
How can I tell if mould is hidden inside my walls?
Identifying hidden mould is the first step in learning how to get rid of mould effectively. The most common indicator is a persistent musty or earthy smell that has no obvious source. Other warning signs include dark stains or discolouration appearing on walls, peeling or bubbling paint, and warped drywall. If you notice these symptoms, particularly in an area with high humidity or a past water leak, it is a strong indication of a hidden mould problem that requires immediate attention.
Does vinegar actually kill mould?
Vinegar can kill surface mould on non-porous materials like tile and glass due to its mild acidity. However, it is not an effective solution for porous surfaces such as drywall or wood, as it cannot penetrate deep enough to kill the mould’s root system. Furthermore, vinegar does not eliminate airborne mould spores or fix the underlying moisture issue that allowed the mould to grow in the first place. For a complete and lasting removal, professional methods are required.