That sinking feeling you get when you spot dark, ugly patches on your ceiling is more than just frustrating-it’s a genuine worry. Concerns about your family’s health, the risk of damaging your paint or plasterboard, and the nagging fear that the mould will just come back are completely valid. Well, you have arrived at the right place. Knowing exactly how to remove mould from ceiling areas safely is the first critical step to protecting your home and reclaiming your peace of mind.
Don’t let mould take over your property. This step-by-step guide is designed to empower you with effective, reliable DIY methods to tackle small mould outbreaks with confidence. We’ll show you what works and what doesn’t, so you can get the job done right. Crucially, you’ll also learn to recognise the warning signs of a more serious infestation, so you know precisely when it’s time to stop and call a professional Mould Removalist for a permanent solution. Let’s restore your ceiling and make your home healthy again.
First, Stop the Source: Why Is There Mould on Your Ceiling?
Seeing dark, unsightly spots on your ceiling is alarming, and your first instinct is to scrub them away. But don’t reach for the bleach just yet. The most critical step in learning how to remove mould from ceiling surfaces permanently is to first identify and eliminate the moisture source. Think of it this way: the mould you see is just a symptom; the real disease is excess moisture. Cleaning the mould without fixing the leak or ventilation issue is like mopping up a puddle while the tap is still running – a pointless and frustrating exercise. The mould will simply grow back, often within weeks.
Before you can win the battle, you need to understand the enemy. To learn more about the organism itself, a good starting point is this guide on What is mould?. Essentially, mould spores are everywhere, but they only become a problem when they land on a damp surface and begin to grow. Your ceiling is providing the perfect environment. Fixing the source first is non-negotiable; it stops the cycle and ensures your cleaning efforts are not wasted. It also helps you determine if you need a roofer, a plumber, or a professional Mould Removalist to solve the problem for good.
Common Moisture Sources for Ceiling Mould
Ceiling mould is almost always caused by water or persistent dampness from above or within the room. Here are the most common culprits we see in Australian homes:
- Leaky Roofs: Damaged tiles, failing flashing, or blocked gutters can allow rainwater to seep into your roof cavity and stain the ceiling below. This is often more noticeable after heavy rain.
- Plumbing Leaks: A slow leak from a shower, toilet, or pipe in an upstairs bathroom is a frequent cause. The water gradually soaks through the floor and into the ceiling of the room beneath it.
- Poor Ventilation: Steam from hot showers or cooking creates a humid environment. Without an effective exhaust fan, this moisture-rich air rises, condenses on the cool ceiling, and creates a breeding ground for mould.
- High Humidity & Condensation: In poorly insulated homes, the difference between warm indoor air and a cold ceiling surface can cause condensation, especially during winter. This provides enough consistent moisture for mould to thrive.
How to Investigate the Cause
You don’t need to be a professional to do some initial detective work. Finding the source is a crucial part of the process for how to remove mould from ceiling areas effectively. Start by:
- Checking the attic or roof space: If it’s safe to do so, look directly above the mould patch for signs of water stains, damp insulation, or daylight showing through the roof.
- Looking for upstairs fixtures: Is the mould in your kitchen directly below the family bathroom? Check the seals around the upstairs toilet, shower, and sink for any signs of water damage.
- Assessing the room’s ventilation: Does the bathroom have an exhaust fan? Is it working properly? Run it during and after every shower to see if it helps reduce steam.
- Noting when the mould appears: If the mould is widespread and gets significantly worse during the colder months, condensation is the likely cause.
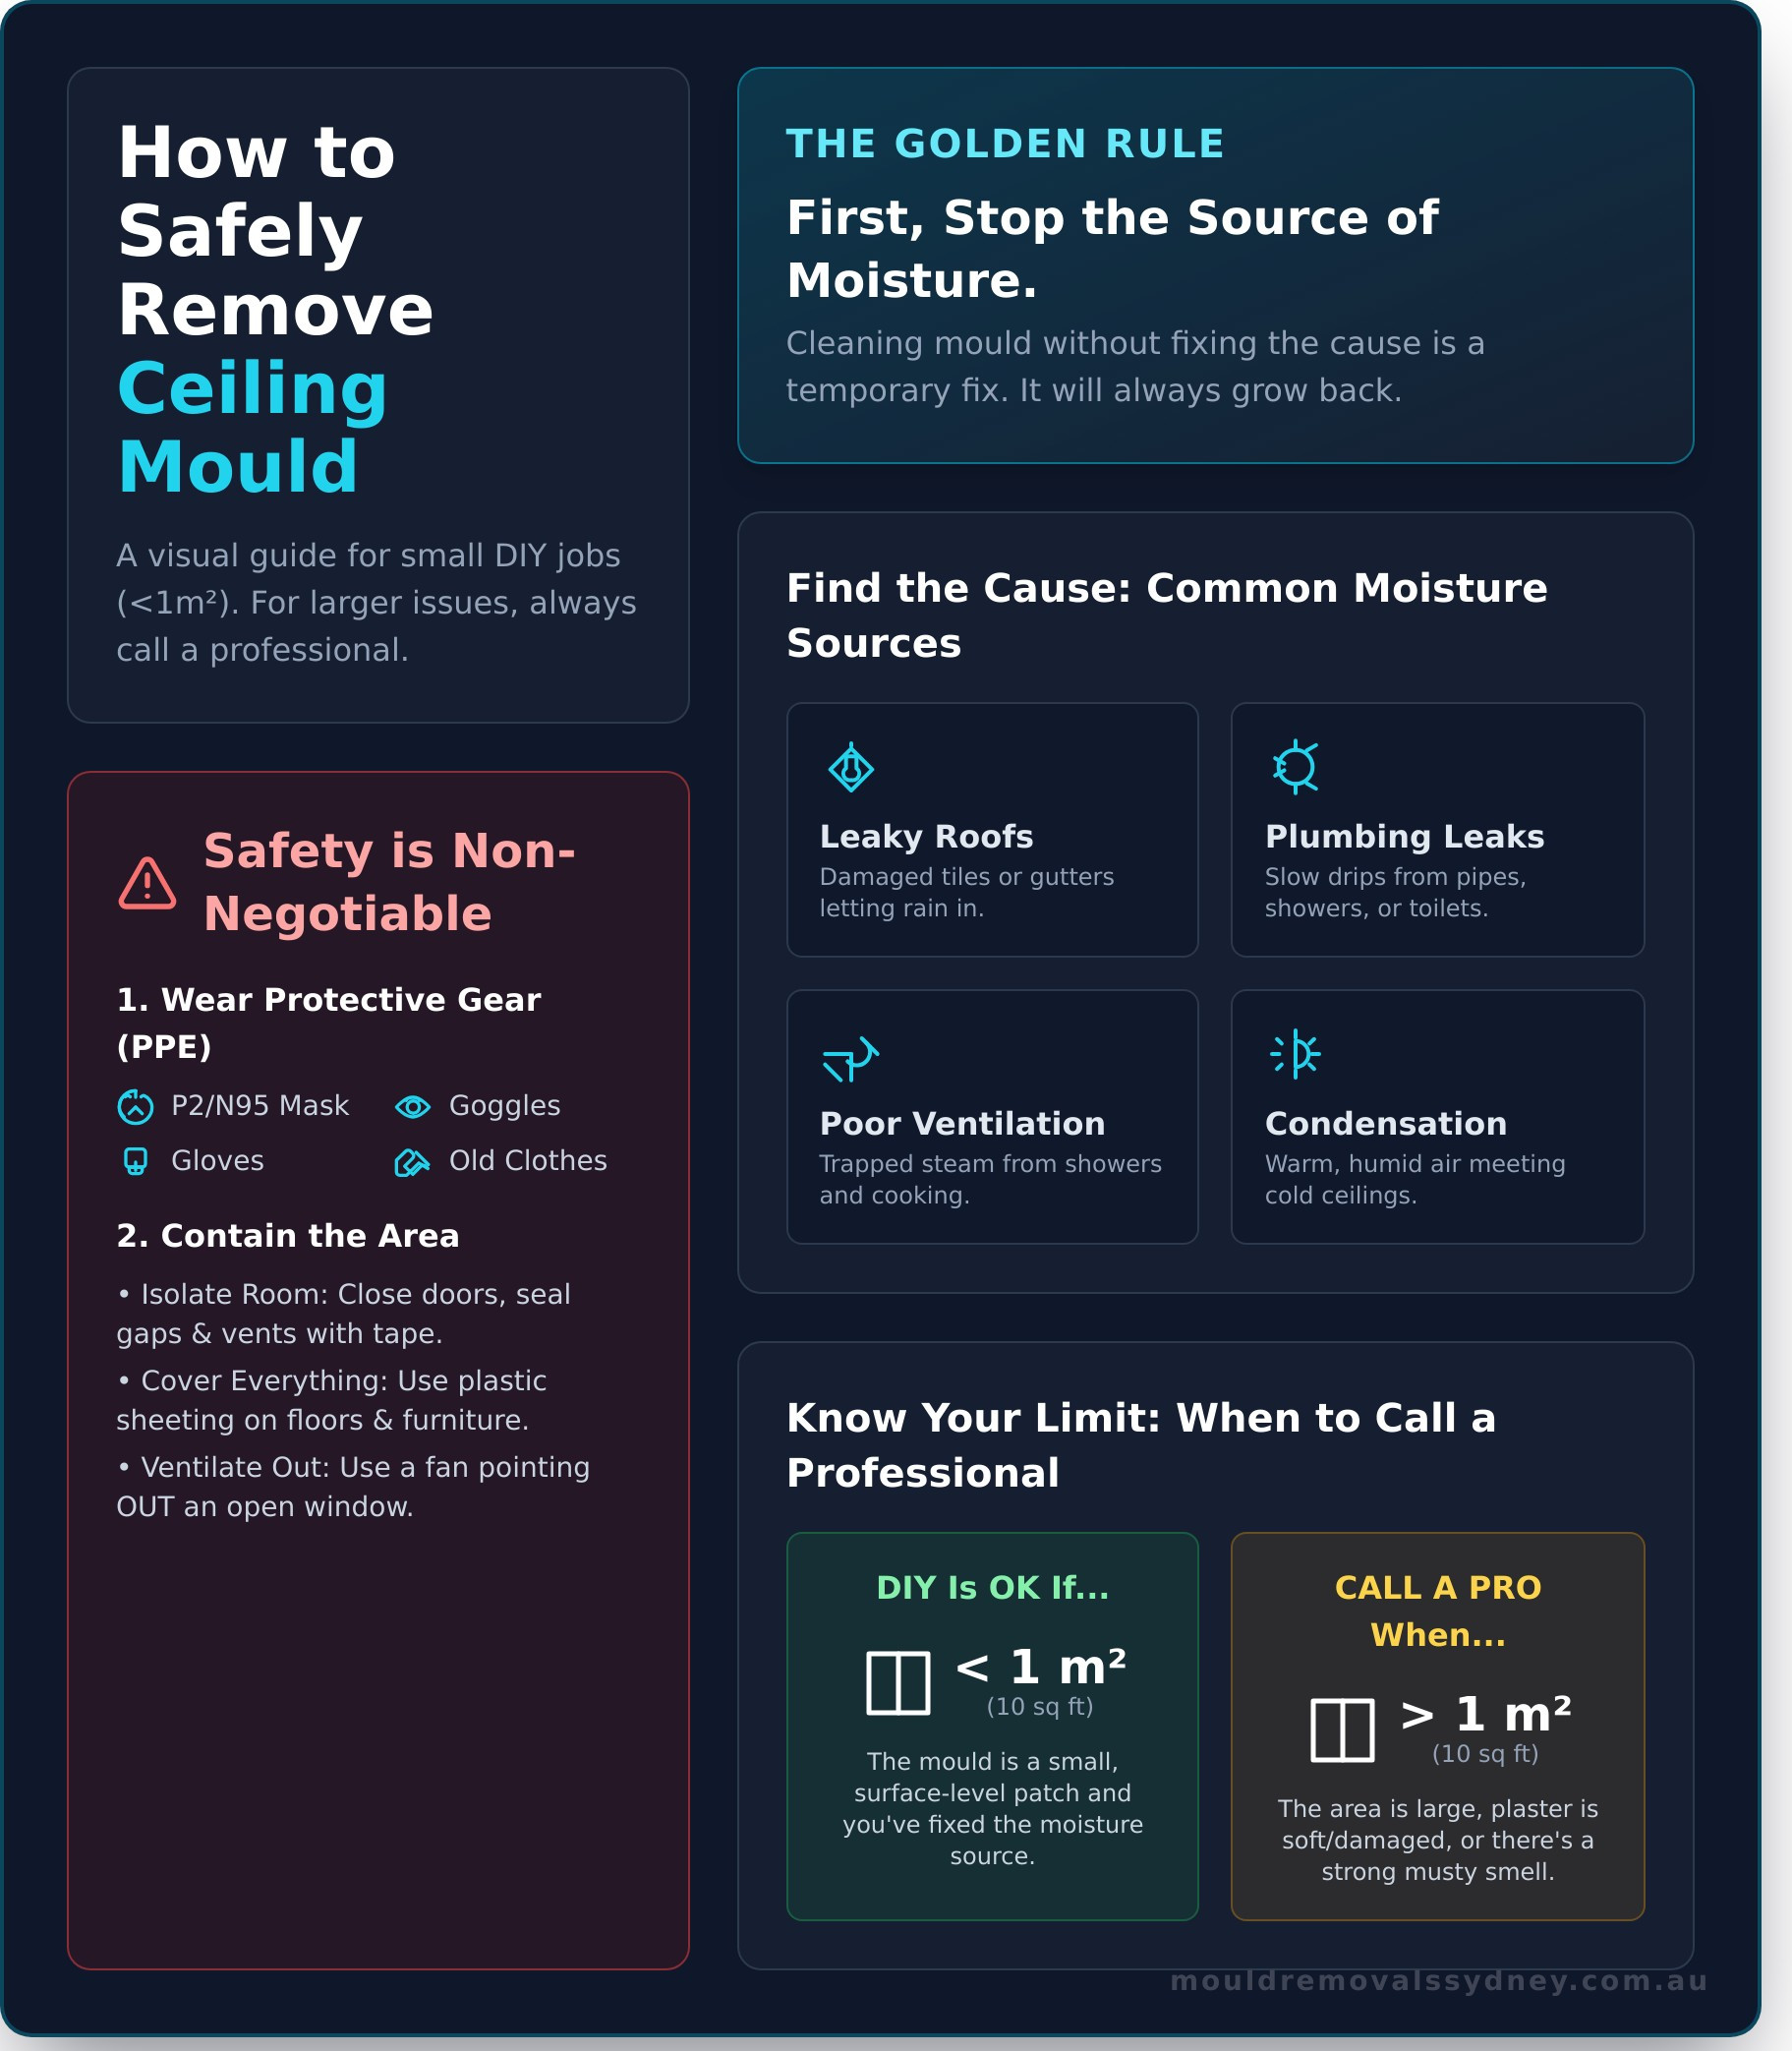
Safety First: Essential Preparation and Protective Gear (PPE)
Before you begin, understand this: safety is not optional. When you start cleaning, you will disturb the mould, releasing millions of microscopic, airborne spores that pose serious health risks. This preparation is the most critical part of learning how to remove mould from ceiling safely and effectively. What separates a safe, successful job from a hazardous one is taking these crucial precautions seriously. Don’t wait until the problem worsens-prepare properly from the start.
Your Essential Mould Removal Safety Kit
Protecting your lungs, eyes, and skin is non-negotiable. Standard dust masks or gardening gloves are not enough. Assemble this professional-grade Personal Protective Equipment (PPE) before you begin any work:
- P2/N95 Respirator Mask: This is essential to prevent inhaling harmful mould spores. Ensure it fits snugly over your nose and mouth.
- Safety Goggles: Choose non-vented goggles to fully protect your eyes from airborne spores and any cleaning solution splashes.
- Non-Porous Gloves: Use long rubber or nitrile gloves to protect your hands and wrists from both mould and chemicals.
- Old Clothing: Wear a long-sleeved shirt and long pants that you can either wash immediately in hot water or discard after the cleanup.
Preparing the Room for Containment
Your next priority is to contain the work area. This stops spores from travelling through your home and settling in other rooms, creating new mould problems. A proper containment strategy is a non-negotiable step for any effective mould removal project.
- Clear the Area: Remove all furniture and belongings from the room. If an item is too large to move, cover it completely with thick plastic sheeting and seal the edges with tape.
- Protect the Floor: Lay plastic sheeting across the entire floor and tape it to the base of the walls to catch any debris or drips.
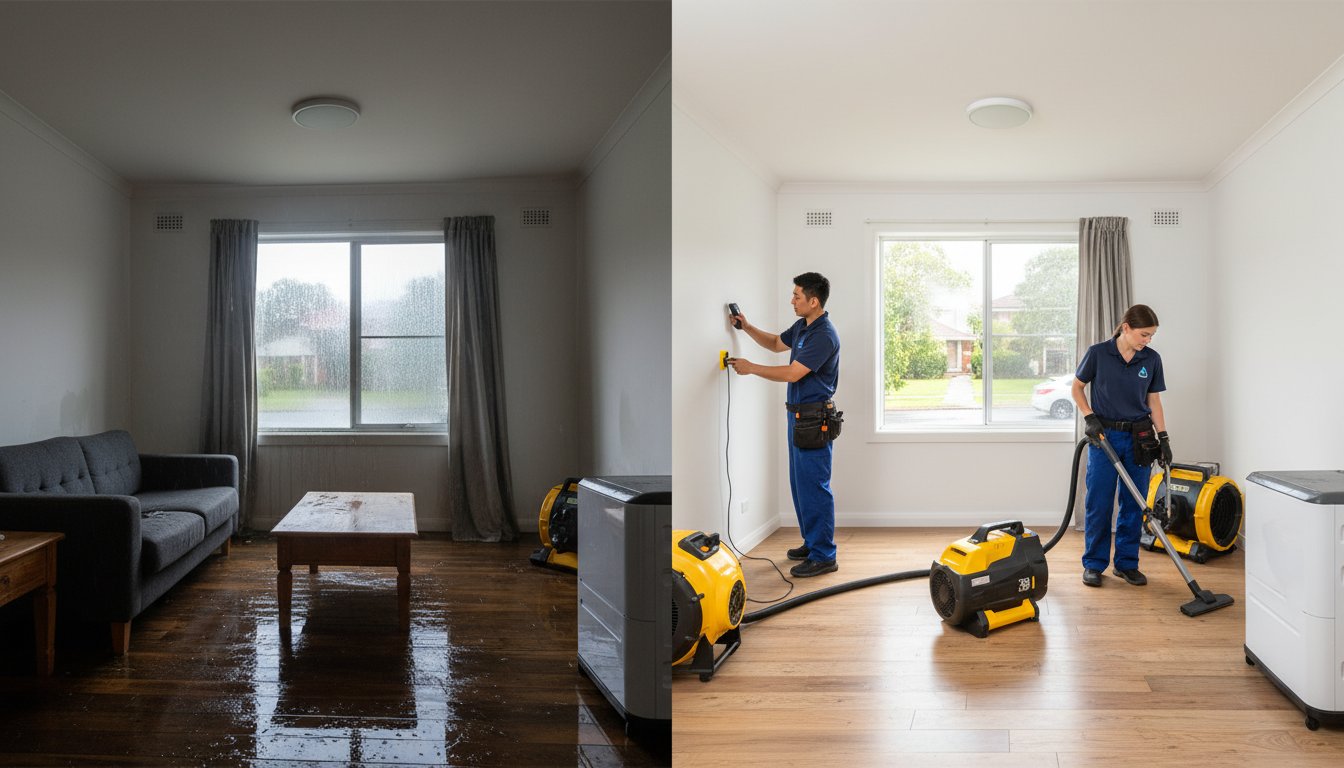
- Isolate the Room: Close all doors and windows. Use painter’s tape to seal the door gap and cover any air vents or return air grilles to prevent spores from entering your HVAC system. These containment methods are standard practice and are echoed in resources like the official EPA guide to mould cleanup.
- Ventilate Safely: If possible, place a fan pointing out of an open window to pull contaminated air out of the room, creating negative pressure. Do not point a fan at the mouldy area, as this will spread spores.
Step-by-Step DIY Guide to Cleaning Ceiling Mould (For Small Areas)
If you’ve discovered a small patch of mould on your ceiling, it’s crucial to act fast. This guide details how to remove mould from ceiling surfaces for areas smaller than one square metre. For larger infestations, or if you suspect the mould has penetrated the plasterboard, do not attempt a DIY solution. Contact a professional Mould Removalist immediately to assess the structural and health risks.
Many online guides recommend bleach, but this is a mistake on porous surfaces like plasterboard and ceiling paint. Bleach can whiten the visible stain, giving a false impression that the problem is solved, while the mould’s roots (mycelium) remain alive within the material. Our method uses a vinegar-based solution, which is effective at killing the mould at its source.
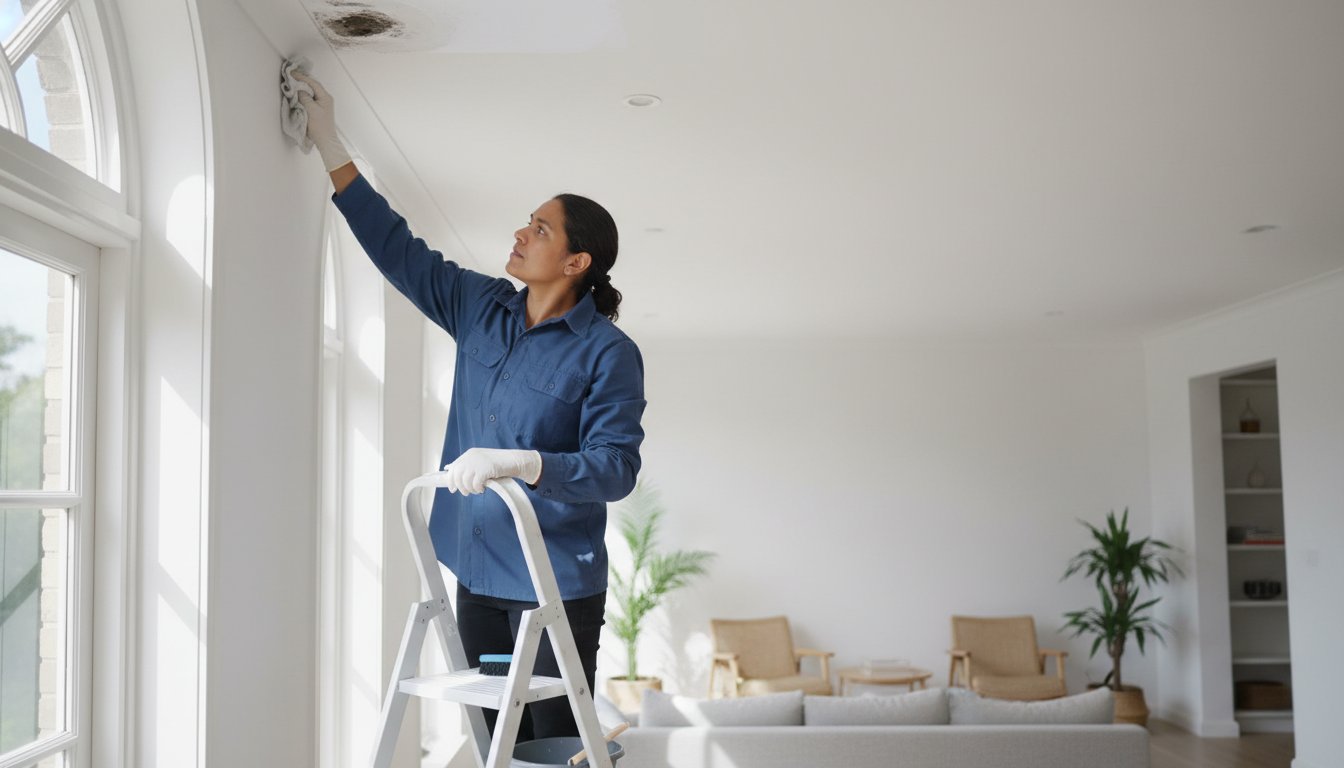
Step 1: Apply the Cleaning Solution
Your first step is to prepare a safe and effective cleaning solution. Don’t reach for harsh, off-the-shelf chemicals that can release toxic fumes. A simple, natural mixture is far more effective for killing mould spores.
- Mix the Solution: Combine one part white vinegar and four parts water (an 80/20 water-to-vinegar ratio) in a clean spray bottle.
- Apply to the Mould: Lightly mist the affected area. The goal is to dampen the mould, not to soak the ceiling. Oversaturating plasterboard can lead to water damage and make the mould problem worse.
- Let It Work: Leave the solution to sit on the surface for at least one hour. This allows the vinegar’s acetic acid to penetrate and kill the mould spores completely. Do not rush this step.
Step 2: Clean the Surface
Once the vinegar solution has had time to work, you can proceed with cleaning the dead mould from the ceiling. Work methodically and gently to avoid damaging the paint or plaster. It’s important to follow safe work practices, as detailed in the EPA guidelines on mold cleanup, to prevent spreading spores to other areas of your home.
Using a damp microfibre cloth, gently wipe away the mould and solution from the ceiling. For stubborn spots, resist the urge to scrub aggressively or use an abrasive scourer, as this can easily damage the surface. Once the mould is gone, use a second, clean cloth dampened with plain water to rinse the area and remove any remaining vinegar residue.
Step 3: Thoroughly Dry the Ceiling
This final step is non-negotiable for preventing the mould’s return. Any lingering moisture is an open invitation for new growth. Pat the cleaned area with a dry, clean towel to absorb as much surface water as possible. To ensure the ceiling is completely dry, increase air circulation in the room. Open windows, use standing fans directed at the ceiling, or run a dehumidifier for several hours. The ceiling must be 100% dry to the touch before you even consider repainting or applying a mould-resistant primer.
Common Mistakes to Avoid (And Why They Make Things Worse)
When you discover mould on your ceiling, the immediate instinct is to get rid of it fast. Unfortunately, many common DIY “fixes” not only fail but can actively feed the mould or hide the underlying issue. Understanding these errors is the key to doing the job right the first time, preventing a small problem from turning into a costly professional call-out down the line. Our goal is a permanent, safe solution, not a temporary cover-up that puts your property and health at risk.
Mistake #1: Painting Directly Over Mould
Applying a fresh coat of paint is one of the most common and damaging mistakes. Paint does not kill mould; it simply hides it from view. The living mould colony will continue to grow and feed on the paint from underneath, eventually blistering and peeling through your new finish. To truly solve the problem, you must:
- Clean and kill the mould first using a specialised, appropriate solution.
- Ensure the area is completely dry before proceeding.
- Apply a high-quality, mould-inhibiting primer to create a barrier against regrowth.
Mistake #2: Using Only Bleach
While bleach can whiten the dark stain left by mould, it’s a poor choice for effective remediation. On porous surfaces like the plasterboard in most Australian ceilings, bleach’s chemical structure prevents it from penetrating deep enough to kill the mould’s roots. It cleans the surface, giving you a false sense of security while the infestation remains. Worse, bleach is mostly water, which can provide the remaining mould spores with the moisture they need to thrive and regrow even stronger.
Mistake #3: Ignoring Airborne Spores
The visible patch on your ceiling is only part of the infestation. A crucial part of knowing how to remove mould from ceiling safely is dealing with the invisible threat: airborne spores. When you scrub or disturb a mould colony, you release millions of microscopic spores into the air. These can be inhaled, posing health risks, and will eventually land on other surfaces to start new colonies. This is why professional air scrubbing is so effective for a lasting solution.
Worried about airborne spores in your home? Learn about our professional air purification.
When to Call a Professional: The Limits of DIY
While DIY methods can be effective for very small, non-recurring mould spots, it’s crucial to know your limits. Tackling a serious mould infestation without the right training and equipment can expose you and your family to significant health risks and may even worsen the problem. Recognising the red flags is key to protecting your property and your wellbeing. When learning how to remove mould from ceiling areas, the most important step is knowing when to call for expert help.
Red Flags That Demand a Professional
Don’t wait until the problem gets worse, because it will. If you notice any of the following signs, put down the spray bottle and contact a certified Mould Removalist immediately:
- The size of the outbreak: The affected area is larger than one square metre. Large infestations often indicate a deeper, more serious moisture problem that off-the-shelf products cannot resolve.
- The mould returns: You’ve cleaned the area multiple times, but the mould grows back quickly. This is a clear sign that the underlying cause has not been addressed.
- Structural damage is visible: The ceiling or wall material feels soft, is crumbling, or shows signs of sagging. This indicates potential water damage that compromises the integrity of your home.
- You experience health issues: Family members are suffering from persistent coughs, sneezing, headaches, or other respiratory issues that worsen inside the home.
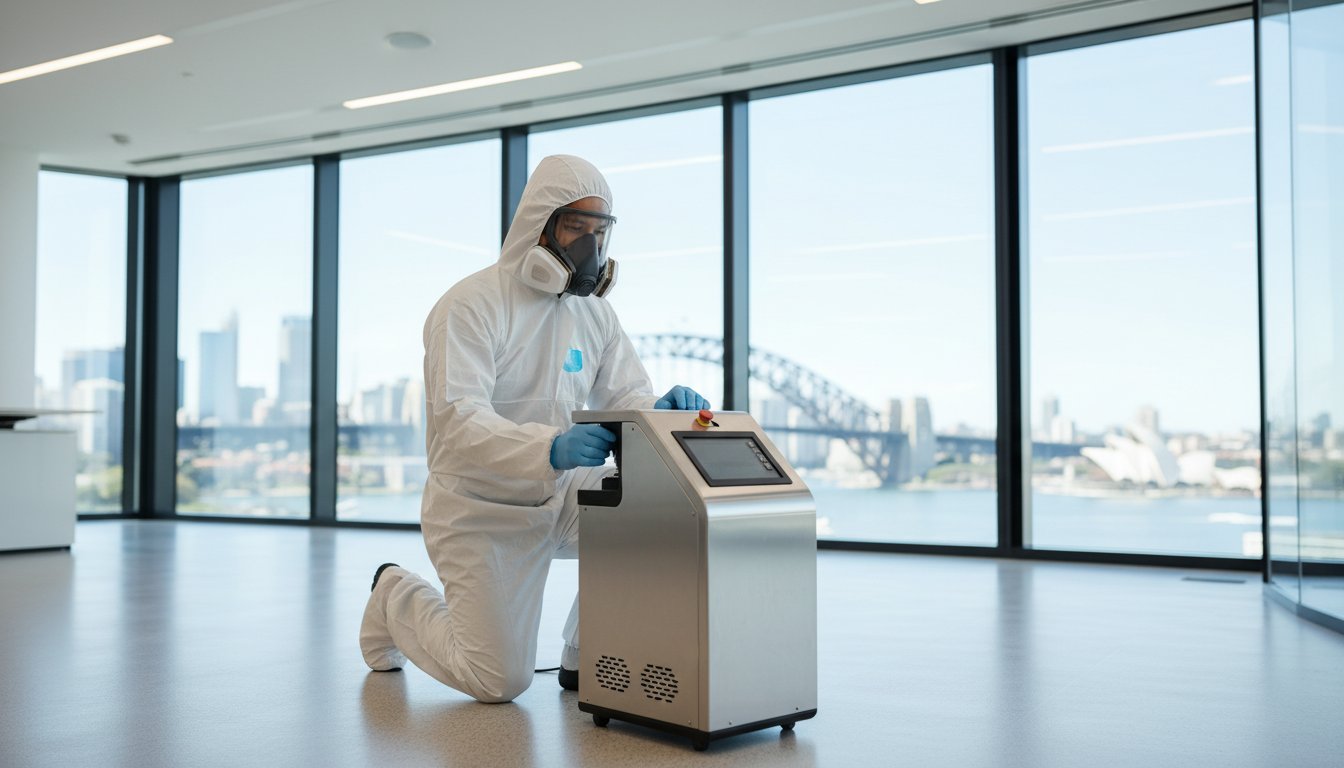
What Our Professional Mould Removalists Do Differently
A professional approach goes far beyond just cleaning the visible stain. Our certified technicians provide a comprehensive remediation service designed to eliminate the problem for good. We use advanced techniques and equipment to deliver a safe and effective result.
- Advanced Moisture Detection: We use thermal imaging and moisture meters to pinpoint the exact source of the water leak or dampness fuelling the mould growth-something a visual inspection will always miss.
- Containment and Air Scrubbing: We establish critical containment barriers to prevent airborne spores from spreading to other areas of your home during the removal process.
- The Goldmorr® System: We are approved technicians for the industry-leading Goldmorr® System. This process not only kills surface mould but uses non-toxic fogging to eliminate airborne spores, ensuring the air you breathe is clean and safe.
- Permanent Prevention Advice: After remediation, we provide expert recommendations to prevent mould from returning, such as improving subfloor ventilation or addressing drainage issues.
If you have any doubts about how to remove mould from ceiling surfaces safely, it’s always best to opt for a professional inspection. Contact our team of expert Mould Removalists for peace of mind and a guaranteed effective solution.
Your Next Step to a Healthy, Mould-Free Ceiling
Tackling ceiling mould always begins with two critical steps: fixing the underlying moisture source and prioritising your safety with protective gear. While this guide provides a solid foundation for how to remove mould from ceiling areas, understanding the limits of DIY is crucial for protecting your health and property from a worsening problem.
When the job is too big or the risks are too high, it’s time to call the professionals. As Sydney’s approved Goldmorr System technicians, we offer a comprehensive solution that goes beyond surface cleaning, incorporating air scrubbing and proven prevention strategies. We are so confident in our effective, affordable service that we guarantee to beat any written quote by 10%.
Don’t wait for the problem to spread. Don’t risk your health. Get a free, no-obligation quote from our Sydney mould experts today! It’s the definitive step to restoring a safe, healthy environment in your home.
Frequently Asked Questions About Ceiling Mould Removal
Is mould on the ceiling a serious health risk?
Absolutely. Mould on your ceiling releases airborne spores that can be inhaled, posing significant health risks. These can trigger allergic reactions, asthma attacks, respiratory infections, and other serious issues, especially for children, the elderly, and those with compromised immune systems. Don’t wait for the problem to worsen. Addressing ceiling mould promptly is crucial for protecting your family’s health and wellbeing. It’s not just an ugly stain; it’s a potential hazard.
What is the best paint to use after removing mould from a ceiling?
After you have completely eradicated the mould, the best choice is a high-quality paint with mould-inhibiting or anti-microbial properties. These paints contain special additives that prevent mould from growing on the surface. Before painting, it’s essential to apply a stain-blocking primer to prevent any water stains from bleeding through. This two-step approach ensures a clean, long-lasting finish and helps protect your ceiling from future outbreaks.
Can I just use an off-the-shelf product like Exit Mould?
While off-the-shelf products can remove the surface stain, they often fail to solve the underlying problem. Most are bleach-based, which only whitens the mould without killing its roots embedded in the plasterboard. This is why mould often returns quickly. For a permanent solution, a professional remediation process is needed to eliminate the mould colony and address the moisture source, ensuring it doesn’t come back. Don’t settle for a temporary fix.
How do I know if the mould has gotten inside the ceiling cavity?
Several signs indicate a deeper problem. If you notice a persistent musty odour even after cleaning, or if the ceiling feels soft, damp, or is sagging, the mould has likely penetrated the cavity. Extensive, dark staining is another red flag. The only way to know for sure is with a professional inspection. A qualified Mould Removalist can use moisture meters and other specialised tools to safely assess the extent of the contamination.
Why did the mould come back after I cleaned it?
Mould returns for two key reasons. Firstly, the underlying moisture source-like a roof leak, high humidity, or poor bathroom ventilation-was not resolved. Mould needs moisture to thrive. Secondly, the cleaning method may have only removed the surface stain, leaving the roots intact. A proper guide on how to remove mould from ceiling permanently always starts with fixing the moisture issue and then using a professional-grade treatment to kill the entire colony.
How much does it cost to get a professional to remove ceiling mould in Sydney?
The cost for professional mould removal in Sydney can vary depending on the extent of the problem. A small, localised job might start from around A$500 to A$800. For more severe or widespread contamination covering a larger area, costs can range from A$1,000 to A$3,000 or more, especially if structural repairs are needed. The best approach is to get a detailed, on-site quote from a certified Mould Removalist for an accurate assessment and a firm price.